
F4R2-Q system, Catch region. On the 1st of January at 19:09 EVE Standard Time, the first shot was fired in the massive offensive that signaled the start of the Winter War.
The attack was perpetrated by Goonswarm Federation [CONDI] and Stain Wagon (SW) coalition in an attempt to destroy the two forward bases deployed by Circle-Of-Two [CO2] and Test Alliance Please Ignore [TEST] in the system to be used in the alliances’ invasion of the area.
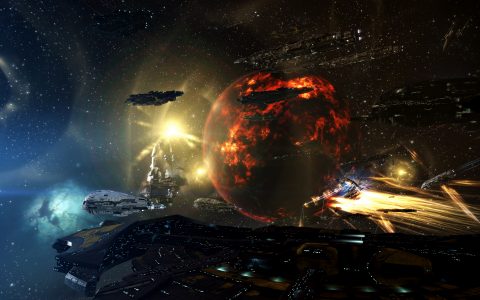
The 9 hour long battle would see thousands of ships destroyed, with both sides fielding massive fleets that clashed spectacularly across the system. Capital fleets and even a supercapital armada would make their appearance, as the two sides fought bitterly over the fate of two Fortizar citadels.
Following the Tribute War, the dispossessed Circle-Of-Two was joined by its ally Test Alliance Please Ignore, who vacated its Vale of the Silent holdings. The two alliances moved to the Curse region, setting a base of operations there. These two alliances, together with DRONE WALKERS [WALKA], formed a coalition with the intention of invading SW holdings in the south-east of New Eden, first targeting the Catch region, which serves as the gateway into the area. They were soon joined by Vanguard Coalition (VG) led by Triumvirate. [TRI] and Phoenix Federation (PF) coalition led by Fidelas Constans [FCON]. The two coalitions each had a score to settle with SW; VG over SW’s aid to its enemy Red Menace (RMC) coalition in the Insmother war, and PF over continued border friction and violations of diplomatic treaties. Thus, the two groups were more than happy to lend a hand to the budding coalition, creating a mega coalition which, for the purpose of this article, will be named Fourth Quadrant, due to all its participants hailing from the North East regions of New Eden.
Circle-Of-Two and Test Alliance Please Ignore chose to attack the F4R2-Q system first, a vital strategic system in the region both for logistics and for launching attacks into the heart of the region. In order to capture the system, two Fortizar citadels were brought and anchored, one for each alliance. An effort was also made to disrupt the system’s infrastructure, resulting in the destruction of the infrastructure hub. This made sure any sovereignty upgrades, such as jump bridges or system wide cynosural jammers, could not be used by the defending SW forces to impede the attackers’ advance.
With the citadels set to online on the night of the 1st of January, both sides realized the first battle of the war, termed the Winter War, was to be fought over the structures. The Fourth Quadrant would have to muster all of its resources in order to defend the citadels and gain a foothold in the Catch region. Goonswarm Federation and SW were cast in the role of attackers, bent on destroying the structures and stopping the invasion dead in its tracks. On the 1st of January, all eyes would be on F4R2-Q.
Goonswarm Federation and its allies, including SW, prepared a massive armada. While exact figures are impossible to tell, due to constant reinforcements and pilots re-shipping, the initial attacking force had no less than two Machariel Battleship fleets, three Proteus strategic cruiser fleets, an electronic warfare fleet (which included many frigates) and several squadrons of dreadnoughts to be used for destroying the citadels. Besides this force, a combat carrier fleet and a supercapital fleet were held in reserve, ready to jump in as needed. This entire force concentrated in the EX6-AO system in Catch, where Goonswarm Federation had set up its forward base.
In response, the defenders assembled a formidable force of its own. Though once again exact numbers are unavailable, no less than three Machariel fleets, a Maelstrom battleship fleet, a Nightmare battleship fleet, a Hurricane battlecruiser fleet, a Tengu strategic cruiser fleet (supplied by League of Unaligned Master Pilots [LUMPY]), a Proteus fleet, a Svipul tactical destroyer fleet and an entire interdictor fleet. The defenders also drew on three separate dreadnought groups, each at full wing (50 pilots) strength. This force would be later reinforced by another Proteus fleet flown by Northern Coalition. [NC] and a Machariel fleet brought by Mercenary Coalition [MC].
The Mittani, leader of Goonswarm Federation, gave a speech a few hours before the first Fortizar was supposed to finish anchoring. The Mittani hoped to use the opportunity to rouse his members and launch the attack before the defending forces were ready, seizing the field first and forcing the defenders to pay a hefty toll just for entering the system. However, the defenders’ main fleet commander, who served under The Mittani in the past, had seen through the plan and rushed his form up, hastily moving his forces into the system and setting them up on the ZXIC-7 gate, the most likely point of entry for the attackers. More and more Fourth Quadrant fleets joined him, forming an effective blockade.
Upon seeing this, the attackers were forced to alter their plans and bridge into the system, using towers and safe citadels as safe spots to portal through their numerous fleets. The defenders, seeing this, changed their position in the system, withdrawing to the 1P-WGB gate and setting up there in order to defend their supply route. The myriad of defending fleets anchored up while the interdiction fleet rushed to lay a massive wall of warp disruption probes, making sure the enemy forces would be caught at optimal range of the guns of the defenders.
The attackers finished bridging the last of their fleets and prepared to engage their enemies. The many fleets initiated warp, heading towards the 1P-WGB gate and the awaiting defenders. The fleets exited warp, all of them intercepted by the wall of warp disruption probes. For a brief moment, both sides simply stared at each other, presenting the illusion of serenity. A few seconds later, that illusion would shatter as the attackers anchored up and the two sides opened fire, signaling the start of one of the bloodiest battles in the history of New Eden.

Bird’s View of the Fighting on the 1P-WGB Gate in F4R2-Q
The battle that unfolded on the 1P-WGB gate was a chaotic sight. The two sides maneuvered their various fleets on grid, attempting to remain in optimal range of their guns. Maelstrom and Machariel fleets exchanged artillery fire, joined by the Hurricane fleet. The Nightmare fleet used its tachyon beam lasers to snipe from afar, while the strategic cruisers fought at medium range, their smaller beam laser turrets and railguns firing away. For the most part the two sides targeted each others’ battleship fleets as they began a bloody trade.
Volley after volley saw a Maelstrom or a Machariel battleship explode in a bright flash. Soon these flashes dotted the entire grid as more and more ships were destroyed in the furious fighting. Logistics wings were, for the most part, rendered useless by the immense fire strikes unleashed upon their fleets, as their adversaries coordinated their vast armadas, marking out individual fleets for destruction. Battleships on both sides caved in to the relentless barrages, soon joined by strategic cruisers and support ships that ventured too close to the optimal range of the hostile fleets.
While the main fleets battled out on the grid, interceptors and interdictors were locked in their own deadly fights. Countless skirmishes developed in and around the maelstrom of battle as frigates and destroyers engaged each other. Soon, interceptors and tactical destroyers swooped in, snatching logistics cruisers or hounding electronic warfare frigates. Anti-tackle squadrons were kept well busy by the smaller ships which buzzed around the edges of the fight like so many vultures.
Stealth bombers had also made their appearance in the fight. Goonswarm Federation in particular utilized a whole wing of stealth bombers, directing them at the battleship formations of its enemies. The small frigates would probe down the hostile ships and warp down towards them, uncloaking and launching their deadly payload into the ranks of the enemy. Countless battleships were felled during these bombing runs, as well as any smaller ship unlucky to get caught in the blast radius. However, the stealth bombers themselves were not immune to the carnage, often caught by interceptors or even friendly payloads as confusion reigned supreme.
Friendly fire incidents became commonplace, as the number of allies on the field increased and the fleets became more spread out. One example saw a Goonswarm Federation Machariel fleet land on top of the Test Alliance Please Ignore Nightmare fleet. Test Alliance Please Ignore was suffering communications issues, its server unable to handle the load presented to it, and was forced to rely on in-game resources. This caused the Nightmare fleet to be caught flat footed. The Nightmares managed to extract the majority of their fleet, warping off as soon as possible, but leaving several squadrons behind. At the same time, a bombing run carried by Goonswarm Federation bombers on the Nightmare fleet was already under way. The bombs hit the few Nightmares caught by the Machariel fleet, but also its own allies.
For nearly three hours the battle on the 1P-WGB gate went unabated. Hundreds of wrecks littered the gate grid, joined by countless corpses of capsuleers who lost ships and were stuck in the fire exchange. Yet, neither side was backing down. Even as losses mounted on both sides, the two simply kept reinforcing their fleets, sending pilots to re-ship and fresh ones to join relief forces which were either bridged in or jumped straight into the fight from 1P-WGB.
As the fourth hour of the fight began, Goonswarm Federation decided to escalate first, slowly streaming in combat carriers to the field. The capitals jumped into the grid, their numbers slowly rising from a mere squadron (10 ships) to a full 100 carriers. The ships unleashed squadrons of fighters, sending a swarm of them at the defending fleets, who tried to dispatch them. Siren fighters quickly pinned down battleships, allowing other fighters to descend upon them and dispatch them with relative ease. Several of the fleets withdrew to a safer distance, while others attempted to keep abreast of the deadly cloud of fighters.

Goonswarm Federation Combat Carriers Jumping into the 1P-WGB Gate Grid in F4R2-Q
At this point, combatants started reporting server performance issues. The server was already straining, the fight having started with 10% Time Dilation, but the arrival of the combat carriers seemed to have pushed it over the edge. Reports from various combatants on both sides were given of desynchronization, unusual module lag or lack of response, not to mention random player disconnects. This would later prove disastrous, especially for Goonswarm Federation.
While the fighting raged on the 1P-WGB gate, Goonswarm Federation and SW used the distraction the battle had generated and brought a squadrons of dreadnoughts to the Circle-Of-Two Fortizar. The dreadnoughts were intended to destroy the structure, or at the very least pause it’s repairing cycle, while the bulk of the defending forces were busy at the gate. However, the arrival of the carriers had pushed several of the defending fleets out, who used the opportunity to re-group and move to defend the actual structures. One by one, the major defending fleets gathered on Circle-Of-Two’s Fortizar and attacked the dreadnoughts.
The dreadnoughts could do very little to resist the immense firepower unleashed upon them. In rapid succession the capitals were destroyed, leaving their wrecks to float near the structure. Yet, before the defenders could celebrate their success, the attackers brought in more dreadnoughts, determined to stop the structure from achieving operational status. The defenders were forced to keep targeting the constant stream of dreadnoughts, taking them down as fast as they could lock them.
By this point, with the 1P-WGB gate mostly deserted by the defenders, the attacking fleets re-grouped as well. SW had to merge its two Proteus fleets after they sustained heavy losses in the fight. The reconstituted fleet warped to the Circle-Of-Two Fortizar, attempting to help its dreadnoughts. Once on grid, the strategic cruisers warped again, landing on top of the Maelstrom fleet, which was isolated from its allies. The strategic cruisers landed near it, opening fire and unleashing their wrath upon it.
The allies quickly reacted, perching across the grid before warping in on the strategic cruisers to free their trapped allies. The strategic cruisers were forced to burn off, pinned down by the defenders, who focused their considerable firepower onto them. Dozens of strategic cruisers were cut down in furious barrages as no less than five defending fleets tore into the strategic cruisers. At the same time, the defenders called forth their own dreadnoughts, in order to deal with the continued dreadnought reinforcements of the attackers.
Several squadrons of dreadnoughts jumped in to defend the Fortizar, the massive ships entering their siege cycles and aiming at their hostile brethren. Once more, the attackers’ capitals were more focused on the citadel than their enemies, leading to many of them being destroyed without a shot fired in their defense. By then though, the attackers had re-grouped and started to land on the Circle-Of-Two Fortizar. Machariel fleets, combat carriers and strategic cruisers rallied on the Fortizar, tearing into it and forcing the defenders to withdraw to the second Fortizar belonging to Test Alliance Please Ignore.
That Fortizar had just finished anchoring, and was supposed to go online, but was once again stopped by a dreadnought squadron belonging to the attackers. The defenders wasted no time, going after the hostile dreadnoughts while their enemies occupied themselves with Circle-Of-Two’s Fortizar, and the few friendly dreadnoughts which had not managed to extract in time. This led the two sides to exchange dreadnought losses as the battle continued.

Dreadnoughts Caught in the Crossfire on the Fortizars in the F4R2-Q Battle
The carrier fleet sent several of its fighter squadrons to the Test Alliance Please Ignore Fortizar, while keeping its focus on destroying Circle-Of-Two’s. The fighters crossed the distance between the two structures and attacked the citadel, preventing it once again from becoming operational. Not content with only using its carrier fleet, the Goonswarm Federation force escalated again, jumping a small supercapital force into the system. The supercapitals, many of whom were supercarriers, warped to the grid, landed at long range of the Fortizars (Approximately 2,000 kilometers) and unleashed their own fighter bomber squadrons. The bombers slowly made their way to the structure, adding their formidable firepower to the mix.
By then, the fight had moved to the Test Alliance Please Ignore Fortizar. The two sub-capital armadas once again clashed over the structure, with fighters and fighter bombers focusing their attention on destroying the citadel itself. The defenders attempted to counter this, bringing in more capital reinforcements, including a squadron of anti sub-capital dreadnoughts (Dreadnoughts equipped with high angle weapons, also known as HAW dreadnoughts) and two squadrons of carriers. The carriers were equipped with space superiority fighters, and quickly targeted the hostile fighter squadrons, shooting many of them down as the sub capital fleets engaged once more.
Once more the battle settled into the usual grind, the opposing forces simply volleying mainline ships on either side. Battleships dropped like flies, every minute seeing half a dozen of them destroyed. Whether it be Maelstrom, Nightmare or Machariel, no battleship fleet was immune to losses as the fight already raged for seven consecutive hours with no respite on the horizon. Pilots would later recall falling asleep at their keyboards, falling victim in the relentless battle that refused to die down. Just as it was on the 1P-WGB gate, on the battle on the Fortizars was ferocious.
With the eighth hour of fighting reaching its end, the engagement still seemed far from over. The Circle-Of-Two Fortizar was nearing total destruction, the attacking force pummeling the structure without pause. What’s more, the attackers started paying attention to the small capital force deployed by Test Alliance Please Ignore, forcing the defenders to attempt and extract it. The vast majority of capitals managed to evacuate, but a fair few got caught by the attackers, and were subsequently destroyed. As this was going on, the Circle-Of-Two Fortizar finally gave in to the enemy fire, and blew apart in a great explosion which briefly illuminated the battlefield, signalling that the first of the two strategic objectives had been accomplished for the attacking forces.
At this point, a few supercapital pilots disconnected from the server in the Goonswarm Federation fleet. The server stressed beyond its limits, caused the ships to warp to the 1P-WGB gate, where they had come from. A few fleet commanders on the defenders’ side noticed this, and sent their forces to the gate in an attempt to capture the supercarriers. The first to warp out was an Aeon super carrier. It landed on the gate, but its pilot managed to log in and warp out in time, evading capture.
However, four other supercarriers were not so lucky. By the time they exited their emergency warp to the gate, following their pilots’ disconnection, they found the defending fleets already prepared for them. Warp disruption probes and focused warp disruption fields snared the behemoths, and the allies started to fire on the mostly defenseless ships. What’s more, cynosural inhibitors were deployed on the field, making sure they couldn’t light cynosural beacons and bring in help.
The Goonswarm Federation Super Capital Fleet Entering the Field on the 1P-WGB Gate. 4 of Its Members Would Be Destroyed in the Fighting.
While this was going on, the attackers turned their attention to the Test Alliance Please Ignore Fortizar, which was by then under-defended as several of the defending fleets had left the grid, going to the 1P-WGB gate in order to destroy the tackled supercarriers. However, the attackers had no knowledge of this, instead believing they managed to ground those fleets, and engaged the few defending fleets that remained.
These few defenders came under a brutal assault from the combined attacking armada, reinforced by fighter squadrons that cut through many remaining battleships. The defenders fired back, taking down hostile ships, but overall traded poorly, mostly due to their reduced numbers.
At the gate, things looked differently. The four supercarriers were slowly going down. In order to hasten their demise, not knowing how long the attacking armada would be occupied on the Fortizar, the defenders brought the remainder of their dreadnoughts to the field, managing to deploy nearly a full wing of capital ships. The dreadnoughts started targeting the supercarriers, tearing into them with devastating fire.
One by one the four super carriers, three Aeons and a Nyx, their hulls bombarded by hundreds of ships. As the last one fell, the attacking forces had nearly brought the Test Alliance Please Ignore Fortizar into ruin.
With the supercarriers destroyed, the defenders remained in the system, guarding their capitals as they extracted and looting the behemoths, stripping them of any valuables which survived their demise. With the last few dreadnoughts safely out of the system, the defending host prepared to extract as well, knowing it could not contest the attacking armada at this point and preferring to retreat. On the Fortizar, the remaining defending fleets, harrowed by their continued defense of the citadel, prepared to extract as well, clearing tackle and preparing to warp out to the 1P-WGB system and retreat.
Finally, the Test Alliance Please Ignore Fortizar fell. Meanwhile, the defenders began clearing the system, jumping out with the attacking forces on their heels, warping after them to the 1P-GWB gate and trying to delay and destroy as many of the remaining defender ships as possible. The defenders did not halt their evacuation efforts, with those unable to flee left to die behind.
This left the attacking forces to take control of the field, clearing the last stragglers before extracting their capital and supercapital fleets safely. Having managed to achieve the destruction of the two Fortizar citadels and win the field, the survivors of the attacking armada extracted their main fleets, having secured complete victory.
The Battle from the Perspective of the Northern Coalition. Proteus Fleet
The Battle from the Perspective of the Circle-Of-Two Proteus Fleet
As the battle still raged on the 1P-WGB gate, Goonswarm Federation lost its first supercapital in the fight, near its staging system. The Aeon wished to deploy with the rest of the supercapital fleet, but decided instead of jumping in with the fleet, to travel directly via stargate. It was soon spotted by local alliances, which had kept an eye on the fighting.
Tactical Supremacy [TIKLE] and Dangerous Voltage [DV] have been embroiled in a long war with SW forces over the few constellations they managed to wrestle from its member alliances in the Catch region. With the war coming to their new home and Goonswarm Federation forces staging in their own constellation, Tactical Supremacy kept an eye on events, but chose for the most part to remain outside the main fighting in F4R2-Q, mainly due to timezone constraints.
However, the alliance and its ally Dangerous Voltage had scouts spot stragglers and returning pilots for quick kills. Their surprise was great when reports came in of the gating Aeon. Realizing the Aeon’s course would take it through the alliance’s staging system of CNC-4V, the two alliances hastily formed a couple dreadnought squadrons and set up interdictors and heavy interdictors on the in-gate of the Aeon. Once the ship entered the system, it found itself trapped in a cover of warp disruption probes, and quickly tackled by the heavy interdictors, preventing it from using the gate to jump back out.
With the Aeon tackled, Tactical Supremacy warped in its dreadnoughts while lighting a cynosural beacon to allow the Dangerous Voltage dreadnoughts to jump in. With the capitals on field, the Aeon stood no chance. The supercarrier faced a relentless capital barrage and succumbed swiftly to it, internal explosions tearing its hull apart before it finally ruptured in a great conflagration.
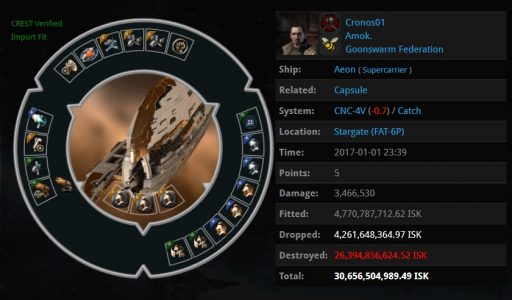
The Goonswarm Federation Aeon Destroyed by Tactical Supremacy and Dangerous Voltage (Click for Killmail)
Undisturbed, Tactical Supremacy and Dangerous Voltage extracted their capitals and looted the wreck, adding another major loss to the attackers.
The battle in F4R2-Q was, put simply, a bloodbath. The fight went on for nine straight hours, and even after the main fighting was over saw continued engagements as remnants of the different fleets logged in and found themselves to be the target of roaming gangs and hostile gate camps.
Though exact figures are unavailable, it was reported that more than 4,000 players took part in the battle simultaneously, with the figure of actual distinct pilot possibly higher due to continued reinforcements by both sides. Time Dilation was at a constant 10% throughout the fight, with many phenomena associated with over-stressed servers reported.
The butcher’s bill for the system stands at 1466 ships at the time of the article’s writing.
Due to the size of the battle, the battle report had to be broken down to smaller segments, which we supplied below in 2 hour chunks:
Battle report for 19:00-20:00 can be found here.
Battle report for 20:00-22:00 can be found here.
Battle report for 22:00-00:00 can be found here.
Battle report for 00:00-02:00 can be found here.
Battle report for 02:00-04:00 can be found here.
Battle report for 04:00-06:00 can be found here.
The defending Fourth Quadrant forces lost 763 ships in the battle, including 148 battleships, 44 strategic cruisers and 21 capital ships resulting in 226.22 billion ISK of damage.
Goonswarm Federation and Stain Wagon lost a combined 703 ships, including 167 battleships, 87 strategic cruisers, 53 capital ships and 4 supercarriers in the fight itself, reaching a total of 466.88 billion ISK damage.
According to Test Alliance Please Ignore and Circle-Of-Two, though the F4R2-Q push proved unsuccessful, the two alliances did manage to successfully deploy forward bases only two systems away, allowing the coalition to continue its push into the Catch region.
While the first battle in the war proved to be both a costly and deadly affair, readers must remember that under the Aegis sovereignty system most battles over systems would take the form of mobile warfare, leaving major fights like this to be fought over staging bases such as citadels. Thus, a second battle of this magnitude is not expected for quite some time. When it does, however, EVE News 24 will be there to cover it.
* All images appearing in this article belong to Razorien and used with his explicit permission.
Salivan Harddin is a member of V0LTA, WE FORM V0LTA, and covers battles across New Eden